Cathedral Ceiling Insulation Detail

user-1243222666
| Posted in General Questions on
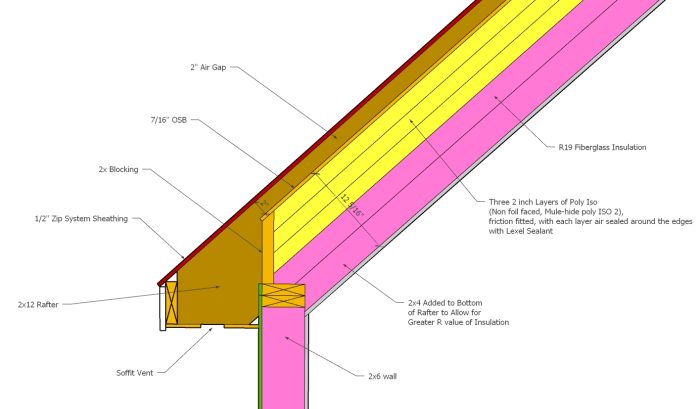
Hi all, will the assembly in the picture work without condensation issues? It will be constructed in climate zone 4a. Or should the Poly Iso be located at the ceiling level with the fiberglass insulation on top near the roof sheathing?
GBA Detail Library
A collection of one thousand construction details organized by climate and house part
Search and download construction details

Replies
User ...666,
Yes but it's one I've never seen. Usually when rigid insulation is used on new construction roofs it is applied continuously to either the exterior or interior of the assembly where it can also limit thermal bridging.
Using pieces of foam in each rafter bay - sometimes called cut & cobble - is typically limited to retrofit situations where the roof can't be vented, by people who want to avoid spray foam.
Again, I not saying it won't work, but the reason you don't see it is because the resulting efficiency isn't commensurate with the labour and cost involved.
If you did pursue this option, I would eliminate the 7/16" OSB baffle, that doesn't really have a purpose.
https://www.greenbuildingadvisor.com/article/five-cathedral-ceilings-that-work
One of the issues is that sealing all that rigid foam in will probably not be 100%, and, even if it is, it might not remain that way over time since there will be some movement of the different parts of the assembly over time with temperature and humidity changes. If that seal is compromised, moist indoor air can make it's way up through the assembly to the underside of the sheathing where it can condense and cause problems.
I would change this to the conventional way of building: put batts between the rafters, and put *all* the rigid foam *above* the roof sheathing, which would be that OSB layer here. That will let you lay down full sheets of rigid foam, which is a LOT less work, and the OSB will give you an air barrier, and there is no need to seal anything with the full sheets of rigid foam (although you do want to stagger the seams between sheets).
Bill
Thanks for the feedback Malcom and Bill. I forgot to mention that the structure itself is already built and it has asphalt shingles covering the Zip roof sheathing.
This is a small room (17' x 15'), so any extra labor involved to complete this is not a problem at all. My thought is that by using the Mule-Hide Poly ISO 2 insulation is that it is not vapor water impermeable, so it would allow any would be moisture to escape into the 2 inch air gap where it would dissipate with the airflow to the ridge vent. If I use foil faced Poly Iso, it is water/vapor impermeable and moisture might collect on the underside of it where the fiberglass insulation meets the poly iso and cause a problem. I'm just not sure for my climate zone, and that is why I am asking. I know that here we do not put a plastic vapor barrier over the wall or ceiling insulation - we just use paper faced insulation instead, but further north they sometimes do use a plastic vapor barrier. I have heard that for this climate zone (4a), that the plastic vapor barrier will cause condensation issues. I'm not sure, and have no experience with that because I have never used a plastic vapor barrier when insulating.
Bill, I've updated the illustration. Since the structure is already built and I can't eliminate thermal bridging by putting the Poly ISO over the roof rafters, would this assembly configuration be more ideal than in the first illustration? As Malcom pointed out, would the 7/16" OSB even be necessary? The only reason I added it in the first illustration is protect the Poly ISO from being fully exposed and to help with air sealing.
Also, It does get below 0° F here for several days in January. I have heard that Poly ISO is unstable in colder temperatures and will lose R-Value when it is very cold. Is this the case? If so, would I be better off placing the Poly ISO layers closest to the conditioned air space, and the fiberglass insulation closer to the 2" air gap near the roof sheathing?
Thanks for sharing your knowledge with me. I just want to do this the most ideal, problem free way possible.
By the way, I did not choose my user name for this community. It is system generated. I've tried to change it, but the system will not let me. My name is Jason. Nice to chat with this community again!
Jason,
With the ratio of rigid to permeable installation in the roof, you are fine in your climate zone - even with polyiso's drift. Including the vent cavity means the permeability of the foam board doesn't matter, and you can use either type.
I'd forgo the OSB, and just use spacers on the sides of each rafter to form the vent space.
Good luck with your project!
Sorry, I hadn't realized this was a vented assembly. With a vented assembly, you don't have all the sealing and moisture risk issues that an UNvented assembly has.
You can skip the OSB layer as Malcolm mentioned, it serves no real purpose here. What I typically do is use 1x2 furring strips on the inside edge of the rafters to space the polyiso down off the sheathing 1.5", which gives you a 1.5" vent channel. This makes it easy to keep the vent channel even, since otherwise you have to work blind. I tack the furring strips up with a finish nailer, then seal the polyiso in place with canned foam.
What I usually do is to use a quick setting adhestive to hold the first layer of polyiso to the 1x2s, with the polyiso temporarily tacked in with some long screws drivin partway at angles. Usually only 2 screws is fine, sometimes you need all four corners until the adhesive sets. Once that's done, and that first piece can be a tight fit, BTW, I cut the next pieces to allow around a 3/8" to 1/2" gap all the way around. I put ALL the rest of the pieces in, then temporarily hold them in place with screws or scrap lumber (sometimes just shims). I inject canned foam into the perimeter gap doing "lifts" that fill around 1 to 1.5 inches at a time, to avoid curing issues. If you try to do an entire deep gap in one shot, you tend to get poorly cured foam and a lot of voids. Don't try to do one panel a time with the canned foam, since it tends to ooze out and then you can't get the next piece in tight to the first and you do NOT want gaps between panels.
The top piece of polyiso alone is fine for the lower barrier in that vent channel.
Bill
Deleted
It looks to me like you are trying to accomplish 2 things:
1. Maintain a ventilated roof that has a cathedral ceiling;
2. Augment the insulation level beyond what you can get with fiberglass alone.
If I got that right then I'll start with #2. If you keep your roof ventilated then you could go with only fiberglass, so long as you maintain the air gap between it and the underside of the roof sheathing. An R38c (c=compact) batt measures 10.25" thick. With a 1.5" air gap, you need a total depth of 11.75". A 2x10 rafter with a 2x4 scabbed to it more than gets you there. I don't know the size of your existing rafters. If they are 2x8, then scab a 2x6 onto them and you can achieve an R38 ventilated roof. If you want to achieve a code level of R49 you could layer 2 batts, an R30c and an R20. That would be 13.75" of batt plus 1.5" air gap, for a total of 15.25". You would need to scab appropriately based on your joist size.
Then the question is just how to maintain the air gap. One way is simply with strips of heavy cardboard, folded and stapled between the rafters. With a bit more effort you could tack 1x2s along the top edges of each rafter, then butt sheets of unfaced EPS foam insulation under those to achieve a 1.5" gap. Something thin, say 1" or 1.5", would still be plenty vapor permeable. Then add your fiberglass R38c under that. You would end up with something in the range of R43.
No need to worry about condensation because the EPS foam is permeable enough to allow for drying through the air gap above. Of course, your air gap should be vented at both the eave and the ridge.
If you want code level R49, using an R38c batt you'd need an additional R11. You could do this with batts, or you could go with a thicker layer of EPS, about 2.5". That's still within the range of a semi-permeable EPS thickness.
If your concern is meeting code then you may be able to go down to R30 for your ceiling if you meet the requirements of Chapter 11, N1102.2.2.
Probably the cheapest way to meet code would be an R30c batt, scabbing your rafters if necessary. That assumes you meet the requirements of the code section I mentioned above. After that it's just a question of how much beyond code you want to go. Keep the unfaced EPS to 3" or less and you'll have a semi-permeable assembly that should not create condensation issues so long as it is properly ventilated. Note that other foams are less permeable.