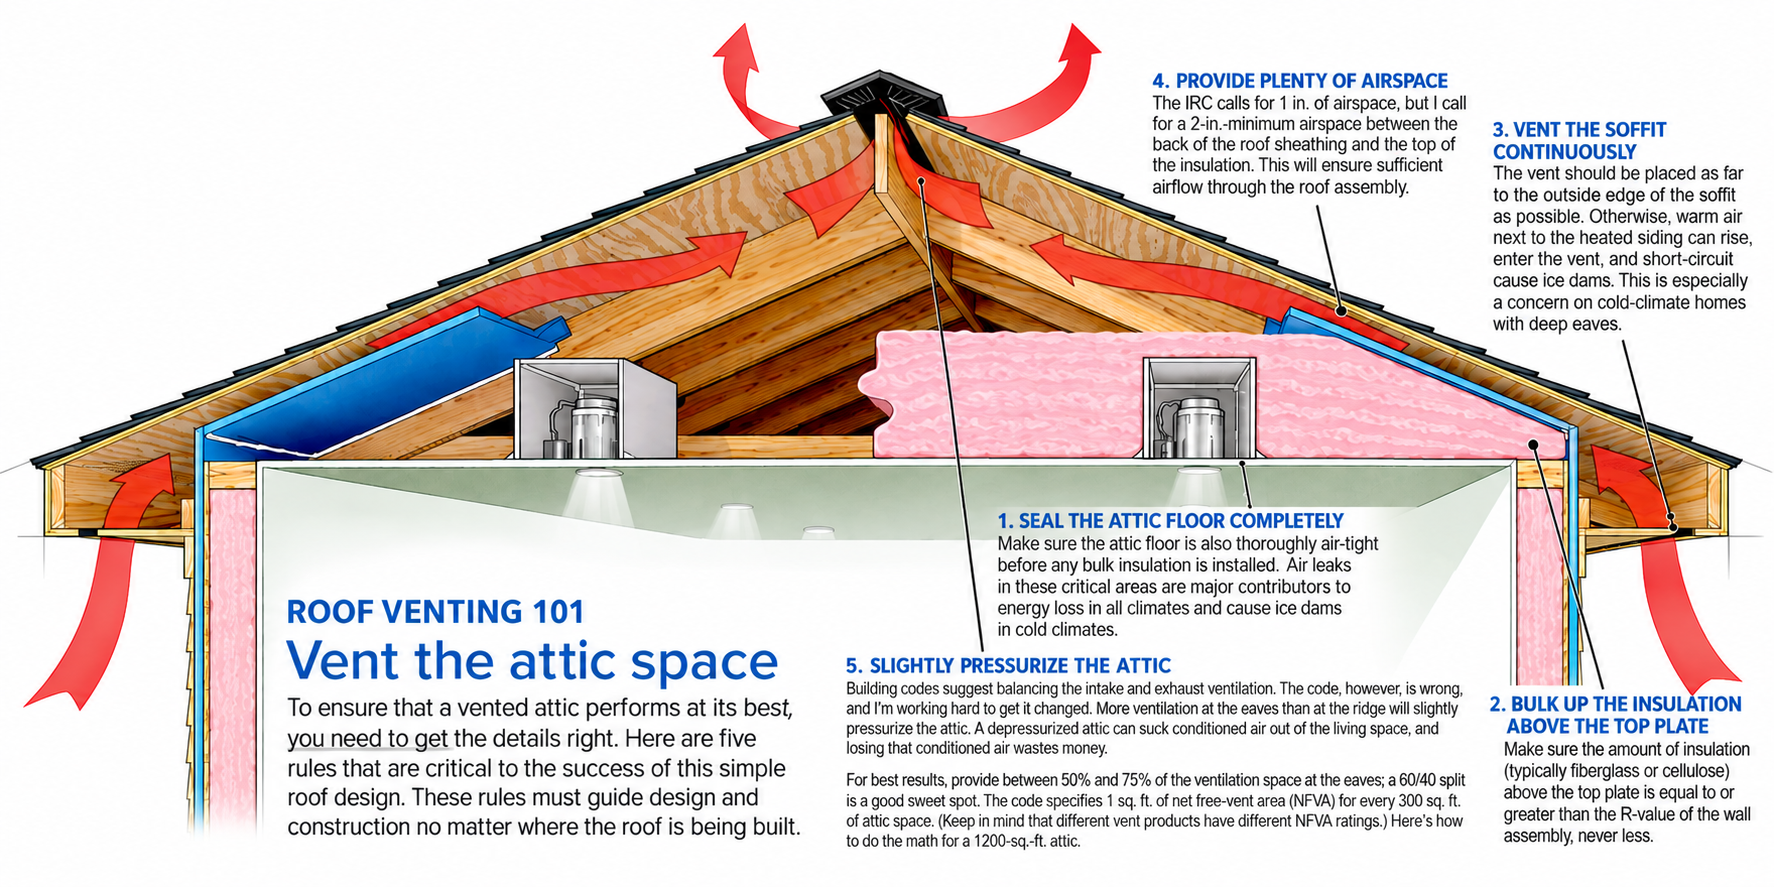
A roof assembly succeeds or fails on air control, insulation placement and a vent path that actually works. The venting choice matters, but the details matter more: a leaky ceiling can drive ice dams, moisture problems and wasted energy, while a poorly vented roof can invite rot or fire. Building scientist Joseph Lstiburek’s central argument is practical: a vented attic is a forgiving, widely useful design when it’s built correctly. The trouble is that common construction shortcuts undermine it.
Start with what the vents are meant to do
Roof ventilation has different jobs in different climates. In cold regions, it helps keep the roof cold enough to limit ice dams and carries away moisture that escapes from the living space into the attic. See Martin Holladay’s Ice Dam Basics for more on ice dams.
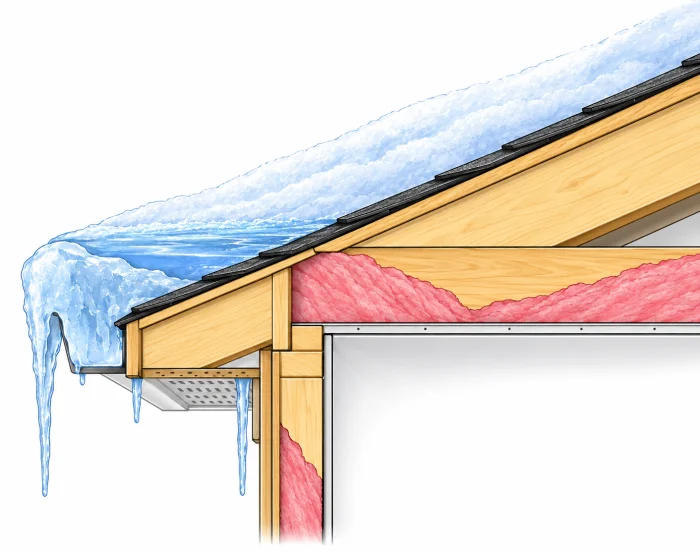
In hot climates, ventilation helps remove solar-heated air from the attic or roof, easing the cooling load and the work required of air-conditioning equipment. Mixed-climate buildings need both functions at different times of year.
That’s why the simple vented attic deserves more credit than it gets. Insulation sits over an airtight ceiling, leaving the attic outside the home’s conditioned space. Done well, this arrangement works across climates, from the Arctic to the Amazon. Done poorly, it can contribute to high energy bills, ice dams, mold, rot and avoidable homeowner stress.
Lstiburek’s advice is to keep insulation and air control in mind before choosing a roof detail. A vented attic is often the straightforward option; conditioning the attic or building a vaulted ceiling changes the problem and may call for a vented roof deck or an unvented assembly.
Keep the attic simple and the ceiling airtight
Venting at the attic floor works with almost any roof shape. Hips, valleys, dormers and gables don’t complicate the ventilation path because the roof itself isn’t part of it. It’s also generally easier and less costly to add fiberglass or cellulose over the attic floor than to fit equivalent insulation into the roof plane.
The catch is the ceiling below. It needs to be airtight before insulation goes in; see Ceiling Air-Sealing. Keep the attic clear of stored items unless you build a raised platform above the insulation. Compression and disturbance reduce insulation performance. Access hatches need attention too: they’re commonly leaky, and frequent use can make them leakier.
Here’s where builders often undo the advantages. Recessed lights and other ceiling openings can leak air, while air handlers and long duct runs add more equipment to an unconditioned attic. In cold climates, that leakage can help create ice dams; in hot climates, it can cause humidity problems. Either way, it wastes energy.
Duct sealing has limits. Even careful work may reduce leakage from 20% to around 5%, which Lstiburek says is still too much. And you can’t assume every ceiling penetration will be sealed well in the field. If ducts or mechanical equipment must occupy the attic, or the ceiling has many openings, bringing the attic inside the home’s thermal envelope can reduce the consequences of leakage.
When the roof deck needs ventilation
If the attic will be conditioned, used for living or mechanical space, or replaced by a vaulted ceiling, the International Residential Code’s provision R806.3 calls for continuous ventilation above the roof deck, from eaves to ridge. That’s manageable on a simple roof. Hips, valleys, dormers and skylights can interrupt rafter bays and make a continuous route difficult or impossible.
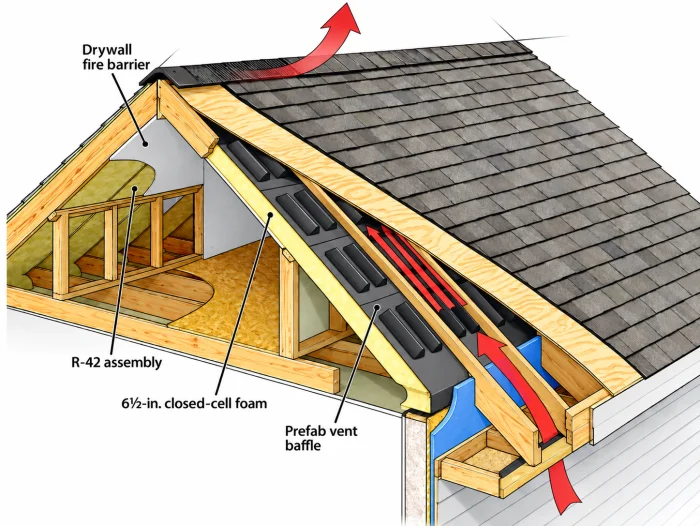
The code’s minimum airspace is 1 in., but Lstiburek recommends at least 2 in. in the vent channel. That extra depth takes space away from insulation, so achieving the target R-value may require furring out rafters—unless closed-cell spray foam fills bays framed with 2×8 or 2×10 rafters. It adds work, but too little airflow can create problems of its own. Ventilation area can be checked with straightforward calculations.
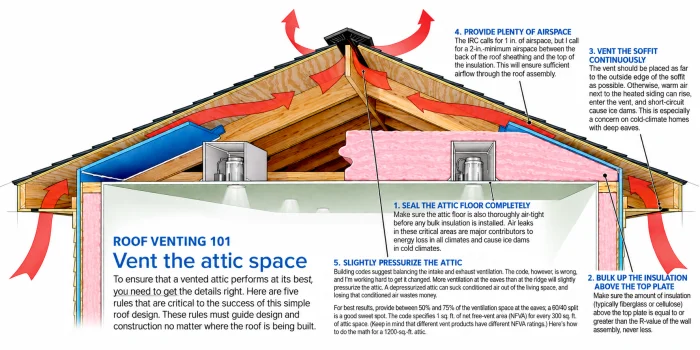
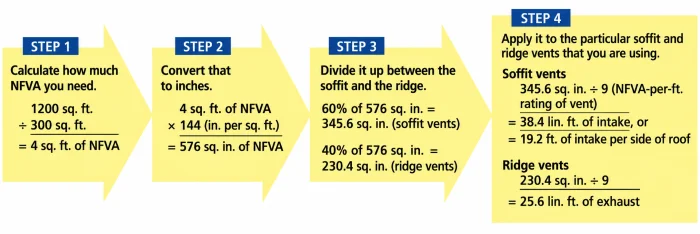
Editor’s note: The IRC generally requires 1 sq. ft. of net free ventilating area (NFVA) per 150 sq. ft. of vented space. Under specified conditions, the ratio can be reduced to 1:300. Those conditions include placing 40% to 50% of the required ventilation high in the attic and the remainder low. In Climate Zones 6 through 8, the exception also requires a Class I or II vapor retarder on the ceiling’s warm-in-winter side.
Vents also create exposure. Wind-driven rain or coastal weather can push moisture into the assembly; snow can enter soffit and ridge openings, melt and contribute to rot. In hurricane-prone areas, a collapsed vented soffit can pressurize the building and help blow out windows or lift the roof. In wildfire zones, embers can enter through vents and ignite the roof. Where those risks matter, an unvented roof may be the better path.
When an unvented roof makes sense
IRC provision R806.5 permits unvented roof assemblies. They can suit complex roofs that are hard to vent continuously, or designs where venting would leave too little room for insulation. High-snow-load regions may still need a vented over-roof to manage ice damming, creating a hybrid system.
The aim is to keep the roof sheathing—the main condensing surface in the assembly—warm enough to avoid moisture buildup. In most climates, that means insulating the sheathing. Hot, dry places such as Phoenix are an exception where condensation is less of a concern.
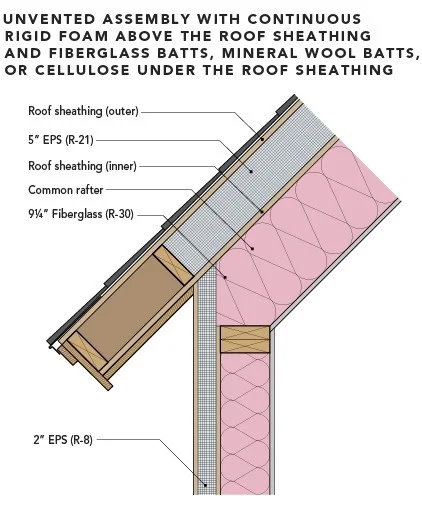
Common methods include rigid foam above the sheathing or air-impermeable spray foam against its underside. Fiberglass or cellulose can go below the roof deck when rigid foam sits above the sheathing. Flash-and-batt, also called flash-fill, is another permitted approach. Each can control condensation if the foam is thick enough for the climate and assembly.
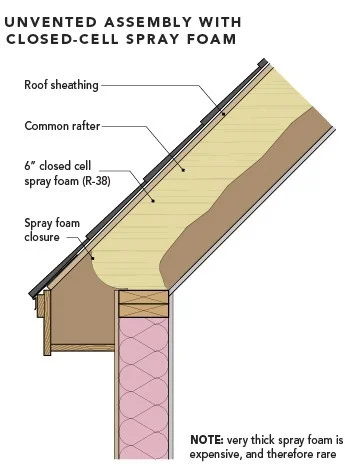
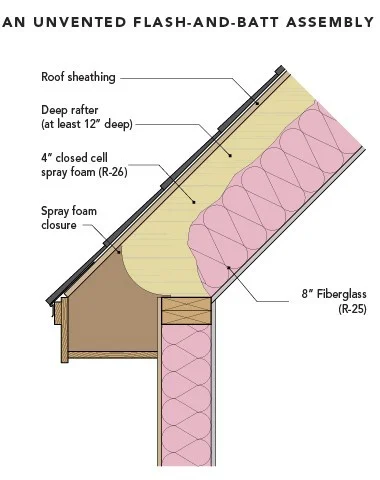
Foam choice matters. Closed-cell spray foam works in every climate and is especially useful in Zones 5 through 8, where high R-values are needed and the air-impermeable insulation must also act as a vapor retarder. Open-cell foam is allowed too, but in Zone 5 and colder regions it needs a vapor-retarder coating, such as rigid foam or painted drywall.
Shingles bring another detail into play. In hot-humid, mixed-humid and marine climates, inward vapor drive can carry moisture through asphalt shingles toward an unvented roof. The underlayment must have a permeance of 1 perm or less—a Class II vapor retarder—to limit that movement. Check the shingle warranty as well: some manufacturers exclude unvented assemblies or offer only limited coverage.
Shingles on unvented roofs run roughly 2°F to 3°F hotter than those on vented roofs, a difference that may shorten their service life by about 10%. Venting the cladding can extend its life, but battens and a second plywood layer add cost. Lstiburek argues that shingle color and roof orientation have a larger effect on lifespan.
Editor’s note: Climate Zones 1, 2 and 3 may use a vapor diffusion port, an option introduced in the 2018 IRC. The details are beyond this article’s scope; see Martin Holladay’s article on vapor diffusion ports.
Size insulation for condensation control
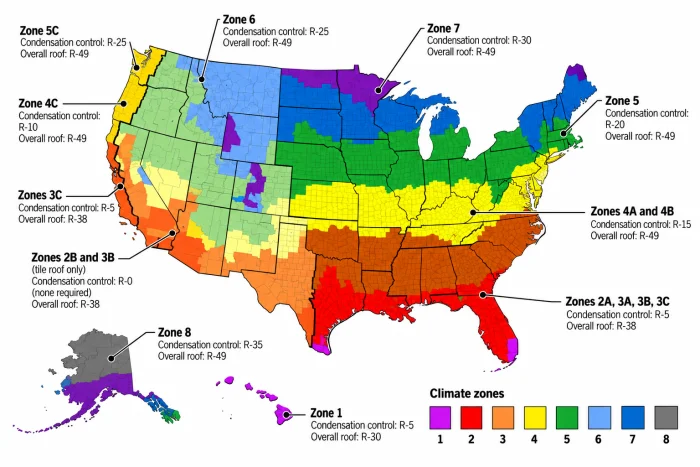
An unvented roof works only if the sheathing stays warm enough to prevent moisture from condensing against it. The map above, based on IRC Table R806.5, gives minimum R-values for condensation control by climate zone. Required thickness depends on insulation type. These figures address condensation; they don’t replace the separate R-values required for energy efficiency.
Where the vent path begins
Whether the design vents an attic or the roof deck, the air path must stay open and the assembly must be airtight where it meets the exterior walls. The bottom of each rafter bay, above the top plate, is a particularly sensitive spot. Baffles guide intake air into the attic or roof vent channel and keep loose insulation from spilling into the soffit and blocking airflow.
Editor’s note: This article first appeared in Fine Homebuilding #221, August/September 2011. It was updated for Green Building Advisor publication to reflect current building-code requirements.
Build the ventilation channel carefully
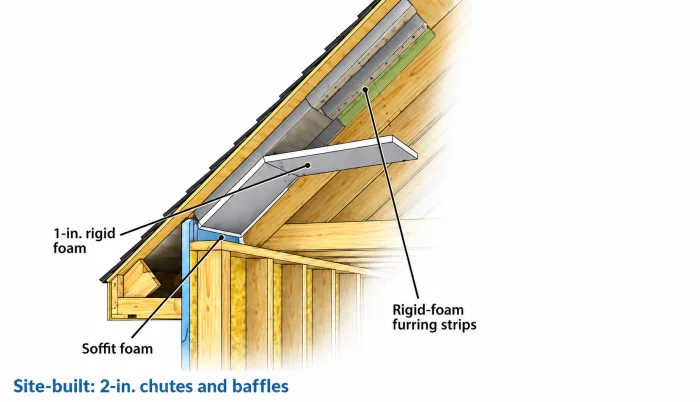
A clear, continuous 2-inch air channel is the point of this detail. Cut 1-inch rigid polyiso into 2-inch-wide strips, then attach them to the underside of each rafter with spray-foam adhesive such as Todol’s Pur Stick. Fit polyiso between the rafters and foam the edges so it stays against the spacers, forming a chute that preserves the channel.
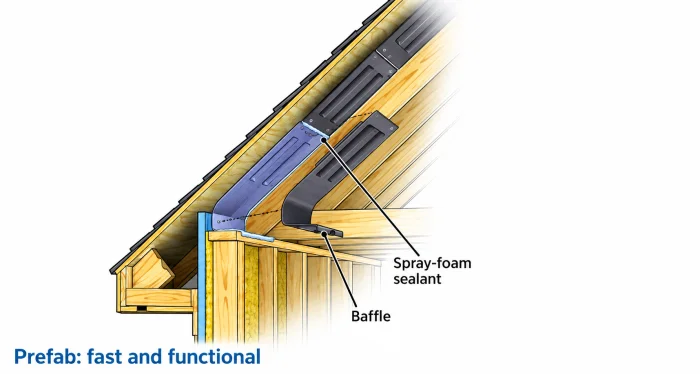
If you’d rather use a ready-made baffle, AccuVent is molded from rigid recycled plastic. It installs quickly with staples and is more durable than foam-based alternatives. Still, staples alone don’t make the assembly airtight: seal the baffle with spray foam. That distinction matters when you’re trying to control air movement through the roof assembly.
Joseph Lstiburek is the founding principal of Building Science Corporation (buildingscience.com) and Lstiburek Consulting Inc. Ownership of Building Science Corporation passed to its most senior principals in 2023.