Making Room for an Electricity Monitor
Adding circuit-level monitoring to a heat-pump subpanel required a separate enclosure, an additional breaker, and a lot more work than expected

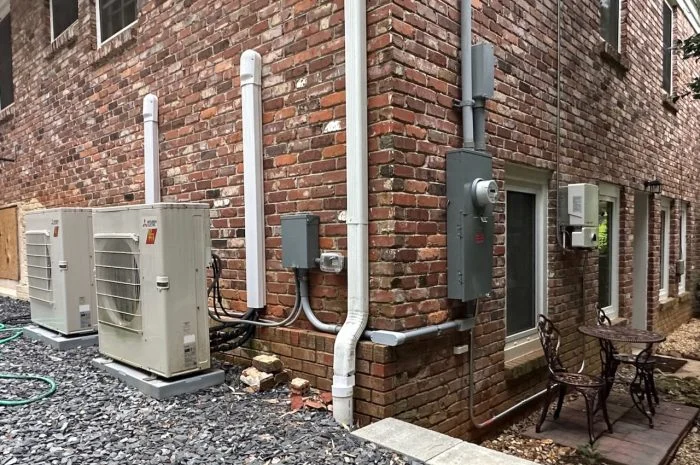
I’ve been using an electricity monitor in my all-electric home since 2022. When I began, it was simple. I had only a single electrical panel to monitor. Then I remodeled my basement, and things became more complex. I still have a 200-amp main panel. I also now have a basement subpanel, an HVAC subpanel, a panel right beneath the meter, and a photovoltaic system. Now I have three electricity monitors installed—and I still need one more. Today, though, I’m going to tell you about the difficulty of getting a monitor on my HVAC subpanel.
The photo above shows the parts of my electrical system that are outdoors. Starting on the right side, the white box above the bistro table is the inverter for my PV system. To the left of that is the meter with its panel. Around the corner is my HVAC subpanel that powers my two main heat pumps sitting next to it. And that panel was the troublemaker.
The problem
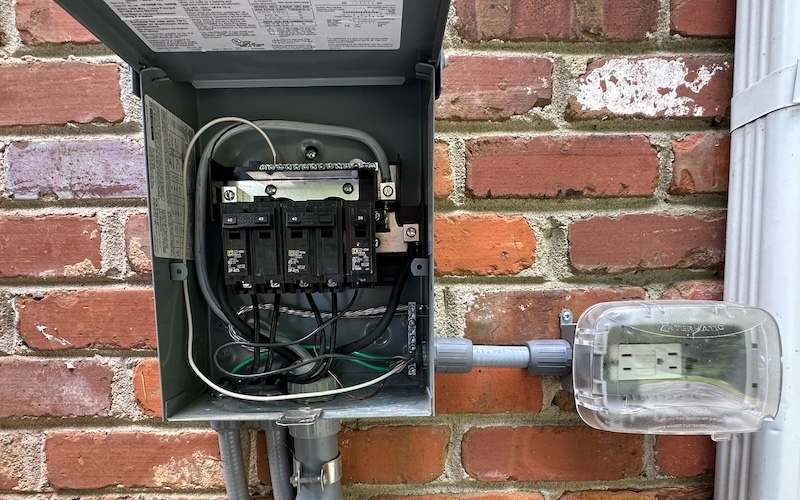
The photo below shows the inside of the subpanel. It looks nice and spacious, but looks can be deceiving.
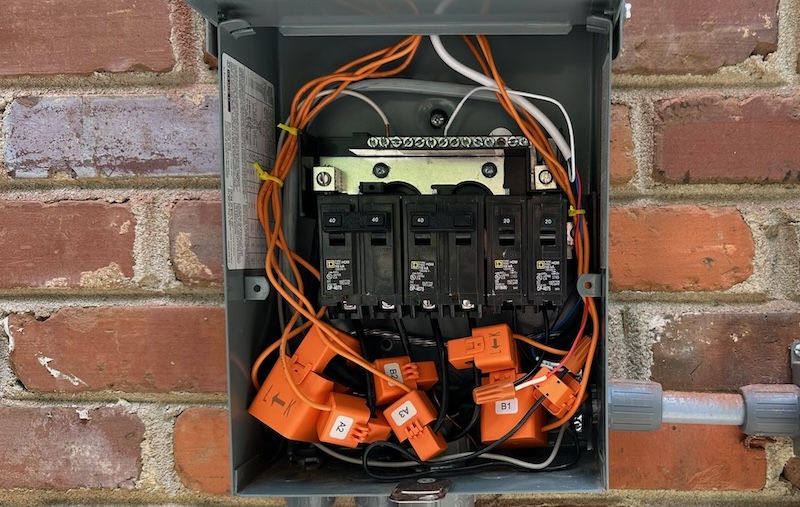
Below you see the panel with the current transformers (CTs) installed. But the main component is the monitor itself, which all those CTs have to connect to. This time I went with a Refoss electricity monitor, the EM16P. As you’ll see in the next section, the monitor is clearly too large to fit into my subpanel.
When I first opened up the subpanel and checked out where I might be able to put the monitor, I thought I might have to give up on monitoring the heat pumps. Then I had an idea.
The solution
Before I get into the details, here’s an important caution and disclaimer.
Caution: This project involved working inside an electrical subpanel. Mine was fully de-energized—I shut off the upstream breaker feeding it and verified it was dead before touching anything. Don’t skip that verification step, and don’t assume a breaker being “off” means a panel is safe until you’ve confirmed it. Also, you can’t always just follow the directions for installing an electricity monitor, as I discuss in the section on the extra breaker. If you don’t know what you’re doing, call a licensed electrician.
This article is for informational purposes only and describes my own experience. It’s not professional advice, and Energy Vanguard isn’t responsible for any injury, property damage, or other consequences resulting from anyone attempting similar work. Electrical codes vary by jurisdiction, so check your local requirements and consult a licensed professional before doing your own panel work.
The idea was to install a separate electrical enclosure for the monitor.
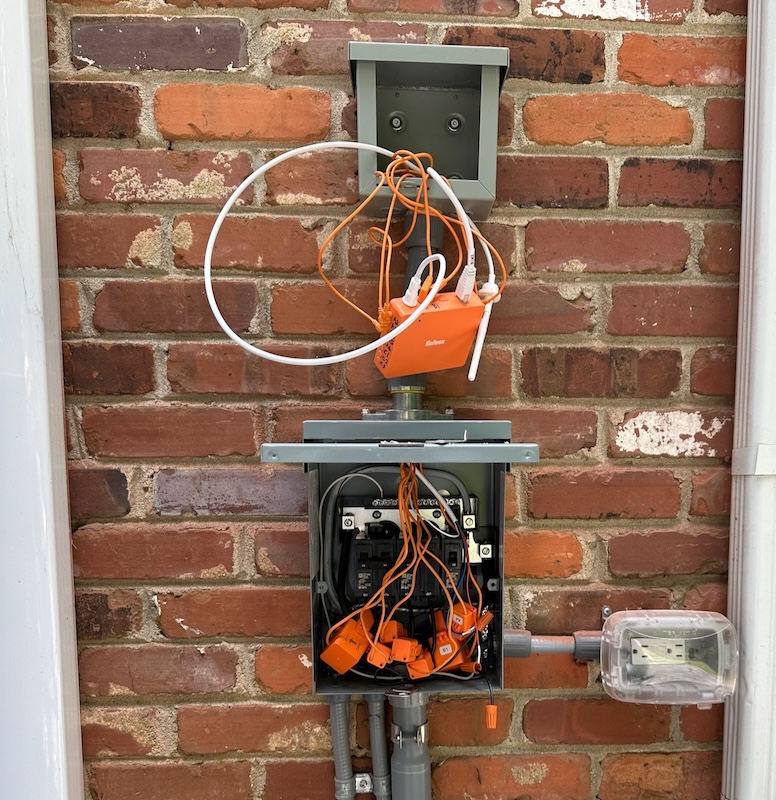
Two trips to Home Depot, three trips to two different Ace Hardware stores, and 30 hours later I had it all put together. The photo above shows what it looked like once I had everything installed and was setting it up. Below you can see what it looks like now.
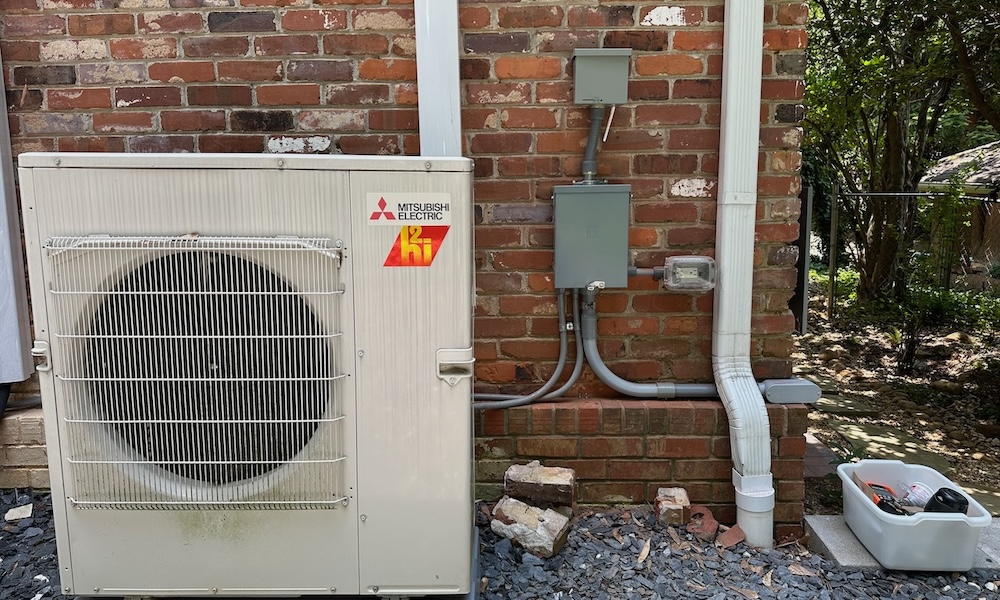
It’s been working ever since.
The difficult in-between
The section above makes it sound easier than it was to make this happen. But there was one thing that did make it easier than it could have been. The Square D panel the electricians installed for me two years ago has an opening at the top, as you can see below. So I just needed to find a weatherproof electrical enclosure and the fittings and conduit to connect the two—hence all the trips to stores.
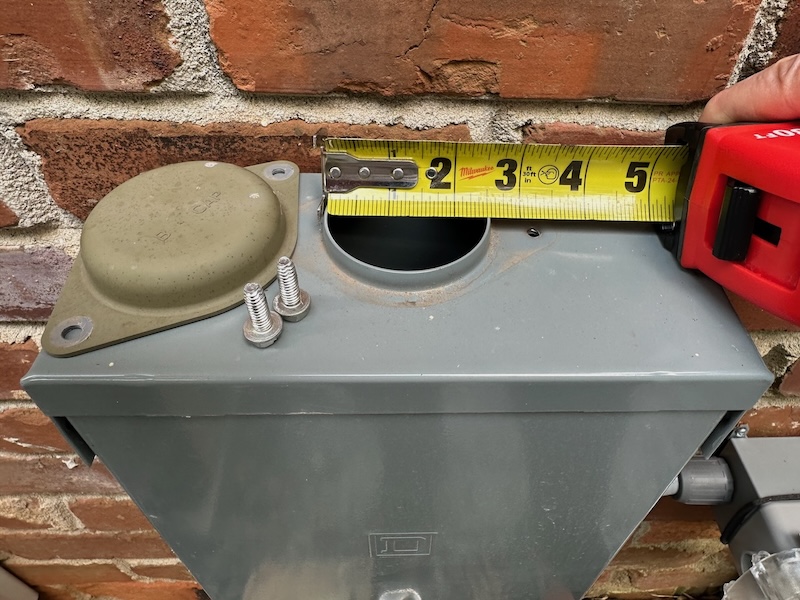
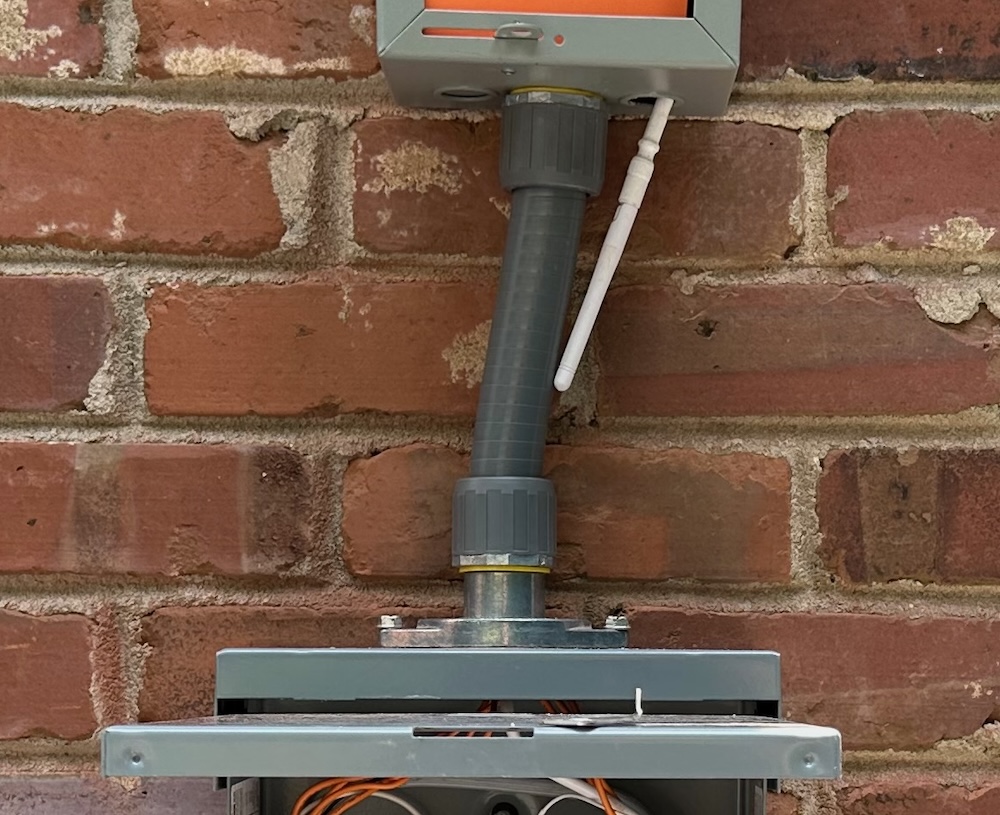
Once I got everything I needed, I managed to connect them (photo below). There are special fittings made for the Square D B-cap opening. Then I just needed the conduit and connectors to make it all work. If you find yourself having to go this route, don’t go smaller than 1 in. with the conduit. That’s what I used, and it was just big enough.
In case you’re wondering, the white piece below my monitor enclosure is the antenna so it can connect to my Wi-Fi.
Home Depot had only one type of enclosure that would work for my project. It’s made by Southwire (based in my old hometown of Carrollton, Ga.), and it had the most difficult knockout I’ve ever had to knock out of a panel or junction box. In fact, I had to get out my drill to break it loose. The arrow below points to the three spots where I drilled.
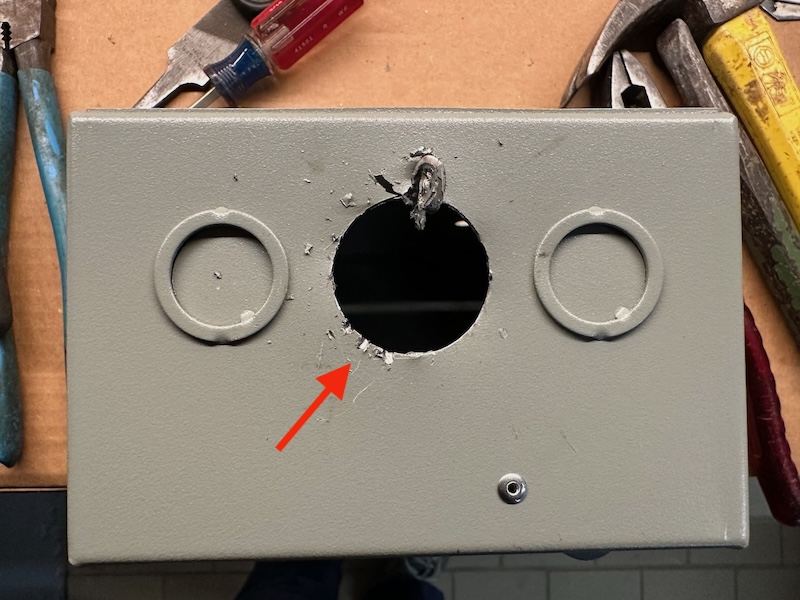
Installing the enclosure box took the majority of my time.
The extra breaker
You may not have noticed, but if you look carefully at the second two photos in this article, you’ll see there’s another difference besides the presence of all the orange wires and CTs. I had to install another breaker, and it’s on the far right in the photo on the right.
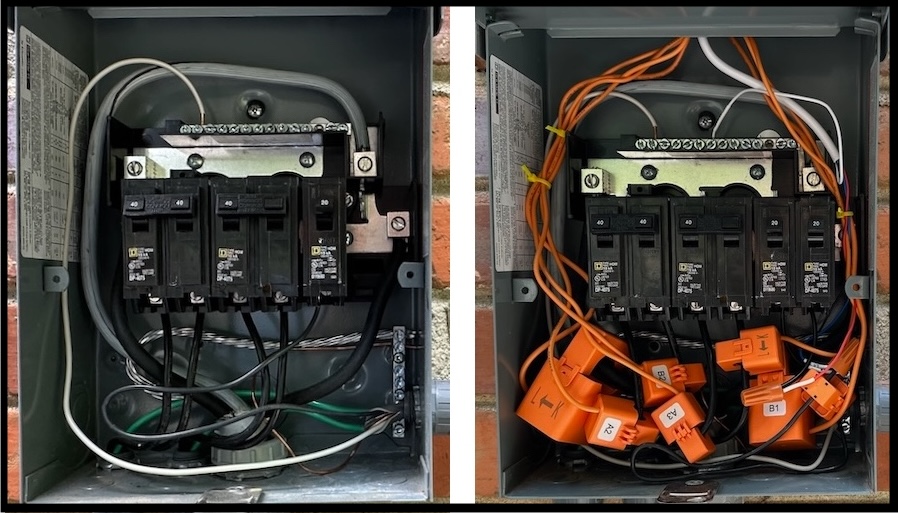
This is the part I mentioned up top about how you can’t always just follow directions. My subpanel had two double-pole 40-amp breakers for the heat pumps and one 20-amp breaker for the outdoor receptacle to the right of the subpanel. The heat-pump wires are heavy gauge because they need to be able to carry more current. And that created the problem.
The electricity monitor needs power, and it needs to monitor the voltage and phase of the electricity. Also, an electrical panel has two sides, the A side and the B side, and you need to monitor both. The receptacle breaker gave me a good place to monitor the A side. But I couldn’t tap into either heat-pump breaker to get the B-side reference. Because of the wire-size difference, I couldn’t do the standard pigtail. And it’s a code and safety issue to connect the monitor wire directly in the breaker with the heat-pump wire.
So I installed a fourth breaker, identical to the one for the outlet. Now I had a way to monitor the B side. That breaker isn’t connected to any other load besides the monitor, but it’s available if I want to install another outdoor receptacle.
The electricity monitor
When I got started with electricity monitoring in 2022, I installed an Emporia Vue. This time I went with the Refoss EM16P because it’s what my friend Ben Knopp recommends now. He knows more about this area than I do, so I bought one and installed it in my main panel (photo below) in mid-June.

Then I bought two more, one for the HVAC subpanel and another for the panel beneath the meter. The meter panel may require another external enclosure for the monitor too, but I’m not ready to take that one on just yet.
The data collection
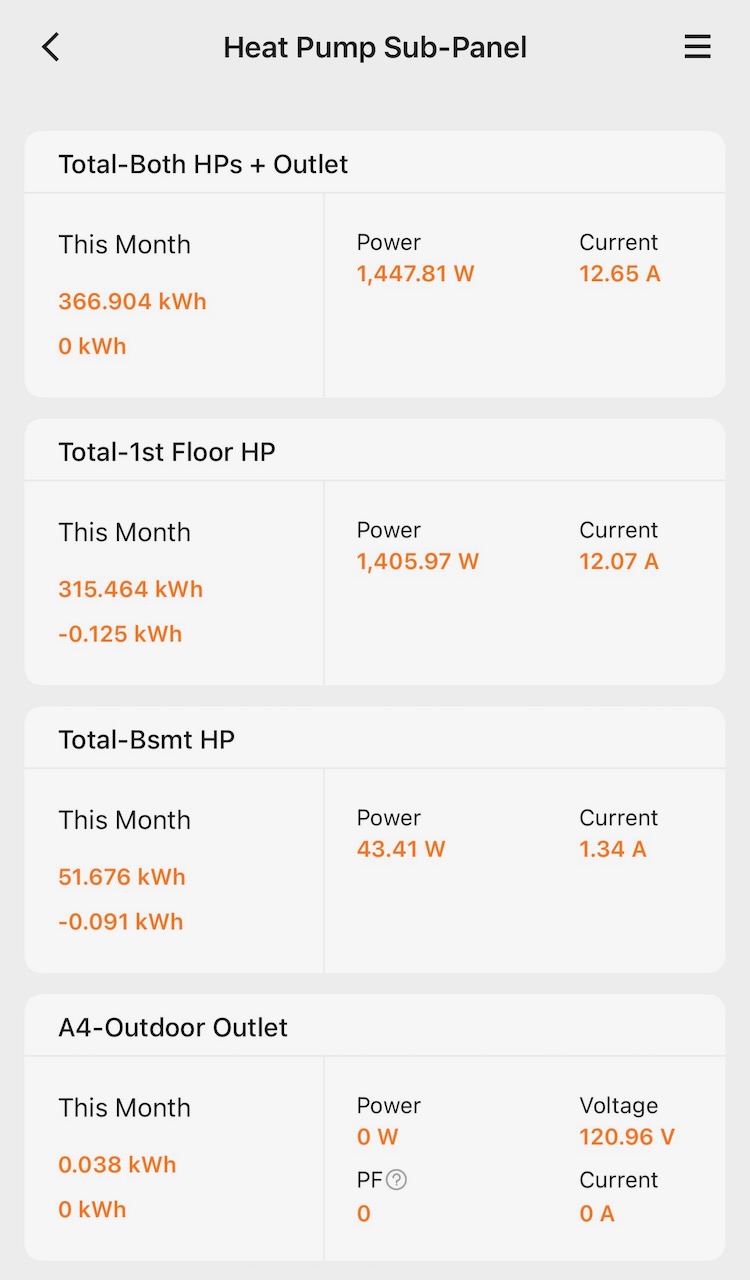
I got all this done by midday on July 2 and have been watching my heat-pump electricity use ever since. The screenshot below shows what the app tells me. At the time, my main-floor heat pump was cooling, the basement heat pump was not, and nothing was happening with the outlet.
And because I have two Refoss monitors, I can look at the data from each one (screenshot below).

Now I’ve got a Refoss electricity monitor on my main panel and on my HVAC subpanel. I didn’t just get rid of my Emporia Vue, though. It’s now installed on my basement subpanel to give some detail about what’s going on there. That covers all my electricity usage.
My SolarEdge app shows me how much solar electricity I’m producing, but I’m not happy with that app (or the company). Once I get the fourth monitor (another Refoss EM16P) on the panel beneath my meter, I’ll be able to see my solar production in the Refoss app as well.
But there’s still another step beyond that. To be able to see all my data in one place—electricity and IAQ—I’m going to install Home Assistant. That’s when the fun really begins!
Allison A. Bailes III, PhD, is a speaker, writer, building science consultant, and the founder of Energy Vanguard in Decatur, Georgia. He has a doctorate in physics and is the author of a bestselling book on building science. He also writes the Energy Vanguard Blog. For more updates, you can follow Allison on LinkedIn and subscribe to Energy Vanguard’s weekly newsletter and YouTube channel.
Weekly Newsletter
Get building science and energy efficiency advice, plus special offers, in your inbox.


